我们研发开源了一款基于 Git 进行技术实战教程写作的工具,我们图雀社区的所有教程都是用这款工具写作而成,欢迎 Star 哦
如果你想快速了解如何使用,欢迎阅读我们的 教程文档哦

如果您觉得我们写得还不错,记得 点赞 + 关注 + 评论 三连,鼓励我们写出更好的教程💪
当我第一次听说TDD(Test-Driven Develop, 测试驱动开发)的时候,我首先想到的是测试小姐姐们想搞事情?后面发现这个玩意儿是想干掉测试,那好,下面开始让我们干掉这群整天给我们找bug…下面开始从简单的单元测试上手Jest测试框架。<br /> <a name=“45851ae3”></a>
我们能学到什么
- Jest怎么4行代码完成一个测试用例
- Jest怎么让测试用例覆盖率100%
- Jest怎么和Typescript完美结合(填坑实录)
- Jest最锋利的功能 Mock Functions<br /> <a name=“72eb0575”></a>
本文所涉及的源代码都放在了 Github 上,如果您觉得我们写得还不错,希望您能给❤️这篇文章点赞+Github仓库加星❤️哦
项目初始化
<a name=“f5050010”></a>
创建工程
# 注意powershell中'&&'替换为';'
mkdir jest-just-go && cd jest-just-go
<a name=“2cb472ff”></a>
初始化
npm init -y
<a name=“277b7e0f”></a>
安装依赖
npm i jest --save-dev
<a name=“c0d7d90c”></a>
1.Jest怎么4行代码完成一个测试用例
<a name=“89e04709”></a>
初始化Jest默认配置
npx jest --init
<br />初始化时会出现提示信息,按y或enter即可。 <a name=“82a379e3”></a>
编写功能代码
<br />现在让我们正式开始,茶和图雀社区精心准备的甜品更搭哦。<br />
<br />在项目根目录下新建src目录,存放我们的功能代码。然后创建src/dessert.js。<br />
const dessert = function (name) {
    this.name = name;
}

dessert.prototype = {
    enjoy: function () {
        return "Enjoy the " + this.name;
    }
}

module.exports = dessert;
<br />我们已经编写了一个甜品类型,它有一个提供品尝的方法enjoy
<a name=“edcf1e3c”></a>
编写测试用例
<br />下面开始编码,实现对上面甜品功能的单元测试。<br />
<br />在项目根目录下新建__tests__目录,存放我们的测试用例。然后创建__tests__/dessert.test.js。<br />
const dessert = require("../src/dessert");

describe("test dessert feature", () => {
    test("enjoy the cake", () => {
        const cake = new dessert('cake');
        expect(cake.enjoy()).toBe("Enjoy the cake");
    })
})
<br />简单的四行代码,我们的第一个测试用例就已经大功告成。这里我们只需要注意 describe、test、expect 这3个 Jest 关键字就行了:
describe:组合同一类的test用例,可以添加beforeEach \ afterEach、beforeAll \ afterAll(这里由于篇幅,这一类进阶特性将放在后续的教程中)为其下所有test进行统一描述和处理。test:描述具体的测试用例,是单元测试的最小单元。expect:Jest最终落在了每一个对测试结果的 期望 上,通过expect中的返回值或是函数执行结果来和期望值进行对比。 <a name=“6bf4eb86”></a>
执行测试
<br />回到控制台,输入:<br />
npm test
<br />无需更多配置,测试结果显示如下:<br />
<br />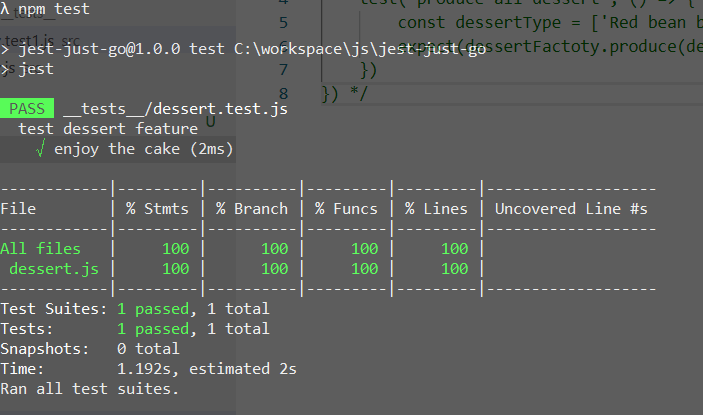 <br />
其中:
<br />
<br />其中:
%Stmts是语句覆盖率(statement coverage):是不是每个语句都执行了?<br />%Branch分支覆盖率(branch coverage):是不是每个if代码块都执行了?<br />%Funcs函数覆盖率(function coverage):是不是每个函数都调用了?<br />%Lines行覆盖率(line coverage):是不是每一行都执行了?
%Stmts 和 %Lines 的区别是:行覆盖率的颗粒度是大于语句覆盖率的,因为可能允许一行中有多条语句(js开发中尤为常见)。<br />
<br />我们更改__tests__/dessert.test.js:<br />
expect(cake.enjoy()).toBe("Enjoy the cake");
改为
expect(cake.enjoy()).toBe("enjoy the cake");
<br />执行测试命令查看测试不通过的情形:<br />
<br /><br />
<a name=“c01ebbd7”></a>
2.Jest怎么让测试用例覆盖率达到100%
<br />当我们的功能场景逐渐变得复杂,我们的测试就必须确保测试用例的覆盖率达到一个标准。最佳当然是100%啦,这样才能保证测试小改改们找不到我们的茬,闲的没事就会主动找我们拉话话啦,美好生活从测试用例覆盖率100%开始。 <a name=“82a379e3-1”></a>
编写功能代码
<br />甜点不够怎么办?要不我们开家店吧!先让红豆烧和提拉米苏够吃先~<br />
const dessert = require("./dessert");

const dessertFactory = function () {
}

dessertFactory.produce = function (type) {
    switch (type) {
        case 'Red bean burning':
            return new dessert('Red bean burning'); // 红豆烧
        case 'Tiramisu':
            return new dessert('Tiramisu'); // 提拉米苏
        default:
            throw new Error("please choose a dessert type");
    }
}

module.exports = dessertFactory;
<br />现在想吃什么通过dessertFactory.produce(...)order就fine啦~
<a name=“edcf1e3c-1”></a>
编写测试用例
<br />不过,要保证我们想吃的时候就必须能吃到(这个很重要),我们先验收先:<br />
<br />__tests__/dessertFactory.test.js
const dessertFactoty = require("../src/dessertFactoty");

describe("test dessertFactoty feature", () => {
    test("produce all dessert", () => {
        const dessertType = ['Red bean burning', 'Tiramisu'];
        expect(dessertFactoty.produce(dessertType[0]).enjoy()).toBe("Enjoy the Red bean burning");
    })
})
<br />–“我不要你觉得,我要我觉得“,我要上档次的“验收报告“!<br /> <br />–行,网页展示出来怎么样<br />
<a name=“oD8DJ”></a>
配置jest.config.js保存测试用例覆盖率执行报告
<br />我们在执初始化Jest默认配置的时候,会生成在项目根目录下生成jest.config.js,里面列出了所有的配置项,未设置的已经被注释掉了。我们要将每次执行测试后生成的覆盖率报告保存下来需要找到下面这项配置属性并更改:<br />
// Indicates whether the coverage information should be collected while executing the test
collectCoverage: true,
<br />然后我们可以再次执行测试命令并用浏览器打开_/coverage/lcov-report/index.html_查看测试用例覆盖率报告:<br />
<br /><br />
<a name=“d3cd0508”></a>
修改测试用例使覆盖率达到100%
<br />__tests__/dessertFactory.test.js
const dessertFactoty = require("../src/dessertFactoty");

describe("test dessertFactoty feature", () => {
    test("produce all dessert", () => {
        const dessertType = ['Red bean burning', 'Tiramisu'];
        expect(dessertFactoty.produce(dessertType[0]).enjoy()).toBe("Enjoy the Red bean burning");
        expect(dessertFactoty.produce(dessertType[1]).enjoy()).toBe("Enjoy the Tiramisu");
        expect(() => { dessertFactoty.produce('Luckin Coffee') }).toThrow("please choose a dessert type");
    })
})
<br />再测试并查看覆盖率报告:<br />
<br />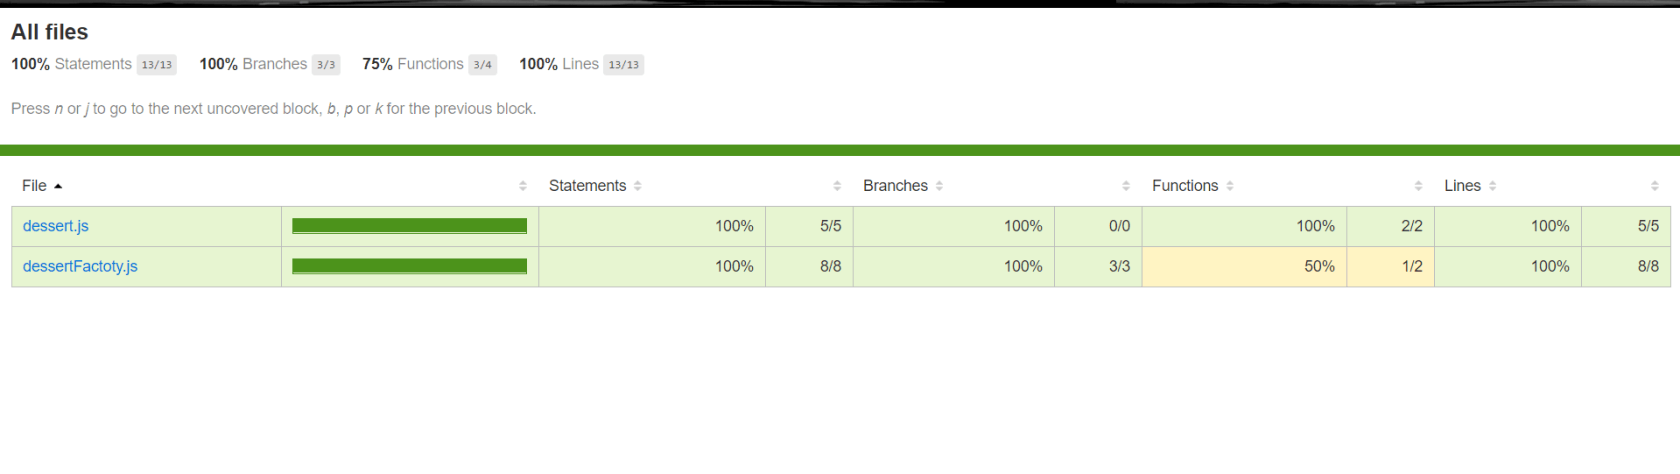 <br />
这里
<br />
<br />这里 Functions列 为什么不是100%,大家可以点击 dessertFactory.js 根据详细说明分析推测。<br />
<a name=“c3ae5cf8”></a>
3.Jest怎么和Typescript完美结合(填坑实录)
<br />搜索引擎上现有的 Jest + Typescript 的样例比较少,并且存在了一定的问题没有解决,这一部分我已经填平了坑,可以作为配置参考。
<a name=“XrNMh”></a>
增加依赖
npm i ts-jest @types/jest typescript @types/node --save-dev
<br />其中 ts-jest 为 Jest + Typescript 环境下进行测试提供了类型检查支持和预处理。
<a name=“3313684d”></a>
ts初始化
<br />在根目录下创建配置文件tsconfig.json:<br />
{
    "compilerOptions": {
        "target": "es5",
        "module": "commonjs",
        "lib": [
            "es2015"
        ],
        "strict": true,
        "declaration": true,
        "outDir": "build",
        "sourceMap": true
    },
    "include": [
        "src/**/*"
    ],
    "exclude": [
        "node_modules",
        "__test__/**/*"
    ]
}
<a name=“5ca865b5”></a>
修改jest.config.js配置
<br />添加如下配置项:<br />
// An array of file extensions your modules use
moduleFileExtensions: [
    "js",
    "json",
    "jsx",
    "ts",
    "tsx",
    "node"
],
// A preset that is used as a base for Jest's configuration
preset: "ts-jest",
<a name=“4100b29f”></a>
修改功能代码
<br />src/dessert.js => src/dessert.ts
export default class dessert {
    name: string;
    constructor(name: string) {
        this.name = name;
    }
    enjoy() {
        return "Enjoy the " + this.name;
    }
}
<br />src/dessertFactory.js => src/dessertFactory.ts
import dessert from "./dessert";

export default class dessertFactory {
    static produce(type: string) {
        switch (type) {
            case 'Red bean burning':
                return new dessert('Red bean burning'); // 红豆烧
            case 'Tiramisu':
                return new dessert('Tiramisu'); // 提拉米苏
            default:
                throw new Error("please choose a dessert type");
        }
    }
}
<a name=“Rfbez”></a>
修改测试用例
<br />__tests__/dessert.js => __tests__/dessert.ts
import dessert from "../src/dessert";

describe("test dessert feature", () => {
    test("enjoy the cake", () => {
        const cake = new dessert('cake');
        expect(cake.enjoy()).toBe("Enjoy the cake");
    })
})
<br />__tests__/dessertFactory.js => __tests__/dessertFactory.ts
import dessertFactoty from "../src/dessertFactoty";

describe("test dessertFactoty feature", () => {
    test("produce all dessert", () => {
        const dessertType = ['Red bean burning', 'Tiramisu'];
        expect(dessertFactoty.produce(dessertType[0]).enjoy()).toBe("Enjoy the Red bean burning");
        expect(dessertFactoty.produce(dessertType[1]).enjoy()).toBe("Enjoy the Tiramisu");
        expect(() => { dessertFactoty.produce('Luckin Coffee') }).toThrow("please choose a dessert type");
    })
})
<br />如同代码重构后我们通过测试用例可以快速检查是否改动出现差错一样,我们这次变更可以执行 Jest 测试命令,检查是否对功能无影响。<br />
<br /><br />
<a name=“dc69bce2”></a>
4.Jest最锋利的功能 Mock Functions
<br />关于 Jest 测试框架中的Mock功能,我们主要关注两点:<br />
mock function: 对函数进行mock.mock return value: 对返回值进行mock.
<br />从以上两点可以衍生出 Jest 对于代码单元测试中两项常用的锋利功能:<br />
- 对功能中业务逻辑简化后的重新实现,方便有指向性的进行测试(比如忽略实际场景中的跨服务调用功能等,仅需将原有功能中对应的调用逻辑改为定义的测试数据即可)。
- 对功能返回值的直接模拟。
<br />为甜点增加了评论功能:<br />
export default class dessert {
    name: string;
    static comment: string[] = [];
    constructor(name: string) {
        this.name = name;
    }
    enjoy() {
        return "Enjoy the " + this.name;
    }
    static comments(message: string) {
        dessert.comment.push(message);
    }
}
<br />专门建立一个互动区进行甜点的讨论。创建src/dessertCommentModule.ts:
import dessert from "./dessert";

module dessertCommentModule {
    export function comments(message: string) {
        dessert.comments(message);
        return dessert.comment;
    }

}

export default dessertCommentModule;
<br />下面开始test dessert feature with mock~这一部分均已通过测试,建议深入研读代码,感受 Jest mock 每一处的奥妙。如果下面各处期望的结果都如你所料,那么你就是图雀社区最靓的仔:
import dessert from "../src/dessert";
import dessertCommentModule from "../src/dessertCommentModule";
jest.mock("../src/dessertCommentModule");

describe("test dessert feature", () => {
    test("enjoy the cake", () => {
        const cake = new dessert('cake');
        expect(cake.enjoy()).toBe("Enjoy the cake");
    })
})

describe("test dessert feature with mock", () => {
    test("enjoy the cake with mock function", () => {
        const dessertFactoryMock = jest.fn(name => new dessert(name));
        const cake = dessertFactoryMock('cake');
        expect(cake.enjoy()).toBe("Enjoy the cake");
        expect(dessertFactoryMock.mock.results[0].value.enjoy()).toBe("Enjoy the cake");
        console.log(dessertFactoryMock.mock);
    })
    test("enjoy the cake with mock return value", () => {
        const dessertFactoryMock = jest.fn(name => new dessert(name));
        const cake = new dessert('cake');
        dessertFactoryMock.mockReturnValue(cake);
        const tiramisu = dessertFactoryMock('tiramisu');
        expect(tiramisu.enjoy()).toBe("Enjoy the cake");
        expect(tiramisu).toEqual(cake);
        expect(dessertFactoryMock.mock.results[0].value).toEqual(cake);
    })
    test("comment the dessert with mock module", () => {
        const mockedDessert = dessertCommentModule as jest.Mocked<typeof dessertCommentModule>;
        mockedDessert.comments.mockReturnValue(['not bad']);
        expect(mockedDessert.comments("cake is so good")).toEqual(['not bad']);
        expect(dessert.comment).toEqual([]);
    })
    test("comment the dessert with mock implementations", () => {
        const mockedDessert = dessertCommentModule as jest.Mocked<typeof dessertCommentModule>;
        mockedDessert.comments.mockImplementation((message: string) => {
            dessert.comments(message);
            return ['not bad'];
        });
        expect(mockedDessert.comments("cake is so good")).toEqual(['not bad']);
        expect(dessert.comment).toEqual(['cake is so good']);
    })
})
<a name=“2a8dc7d4”></a>
mock function
<br />注意:我们可以更改test为test.only仅对test.only的测试用例执行测试,降低测试时间并关注特定测试点。
test.only("enjoy the cake with mock function", () => { ...
<br />这里我们通过 jest.fn 进行 了 mock function 功能的展示,通过执行 npm test 看到 .mock 的结构信息:<br />
<br /><br />
<br />
.mock的中将会记录mock function调用后的相关信息。
<a name=“d9747254”></a>
mock return value
test("enjoy the cake with mock return value", () => {
  ....
<br />这里我们通过 .mockReturnValu 可以将 function mock 的操作略过,直接会返回 .mockReturnValue 中填充的返回值。通过执行 npm test 验证。
<a name=“d7bdeaef”></a>
mock module
import dessertCommentModule from "../src/dessertCommentModule";
jest.mock("../src/dessertCommentModule");
test.only("comment the dessert with mock module", () => {
  ...
<br />通过 jest.mock ,我们 mock 了甜点评论区,这项操作可以使我们对dessertCommentModule中的所有功能进行我们的测试定制。这里我们通过对评论功能进行 mock return value ,通过执行 npm test 看到:<br />
<br /><br />
<br />并没有进入
dessertCommentModule中的comments方法,直接返回了我们预置的返回值。
<a name=“720467b9”></a>
mock implementations
test.only("comment the dessert with mock implementations", () => {
  ...
<br />我们通过对评论功能进行 mock implementations ,通过执行 npm test 看到:<br />
<br />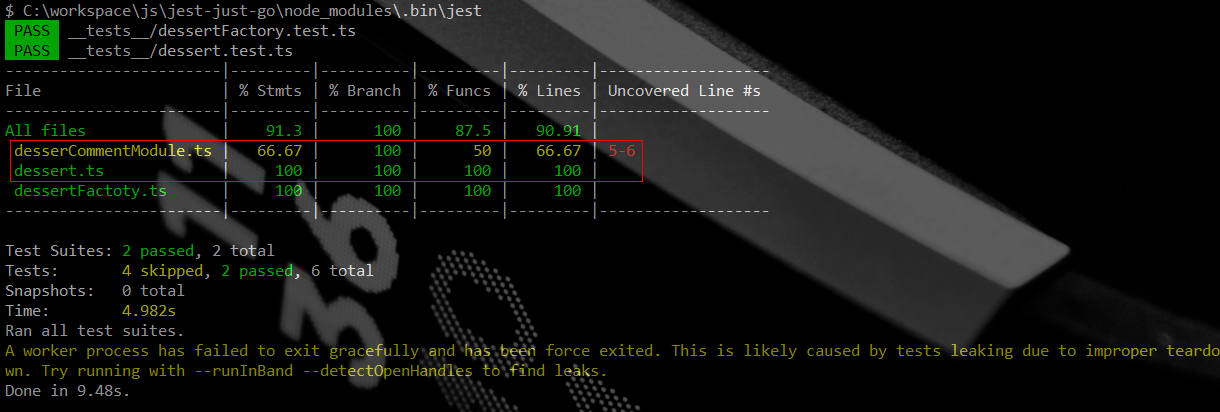 <br />
进入了
<br />
<br />进入了 mockImplementation 中的测试定制功能,并且调用了dessert中的comments方法。<br />
<br />以上。
<a name=“YLfac”></a>
参考
https://jestjs.io/docs/en/getting-started
https://www.valentinog.com/blog/jest
https://dev.to/muhajirdev/unit-testing-with-typescript-and-jest-2gln
想要学习更多精彩的实战技术教程?来图雀社区逛逛吧。
本文所涉及的源代码都放在了 Github 上,如果您觉得我们写得还不错,希望您能给❤️这篇文章点赞+Github仓库加星❤️哦